Saturday, 4 October 2014

Fireman Sam Quilt finally finished

 
I know it as been awhile, if you are just checking out my blog for the first time, the start of this project was a few months ago. If you look back on my blog you will see the start of the creation of this project.
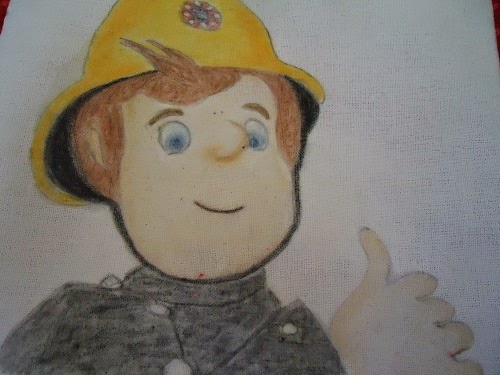
Laying out the piece's as I make them. No actual design I tend to make up the design as I go along. I know this is the incorrect way but I don't have a stash of material, so I tend to use what I have to get started then attempt to create a quilt. All the panels with pictures were coloured with pencils and sealed, them I stitched around edges in back stitch, which helped the pictures to stand out.
 
 
trying to add the large fireman Sam 

 
Here I'm adding the white boarders separating the panels 

 
This is the bottom row of panels finished and ready to have the white boarders attached

 
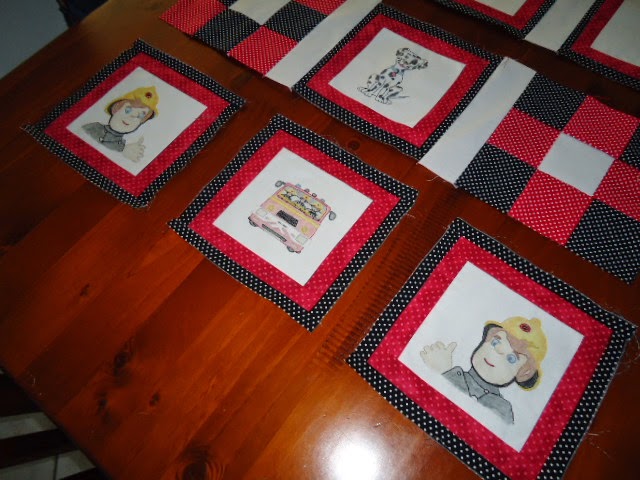
Dining table coming in very handy, trying to visualise the layout of the quilt.
 
 
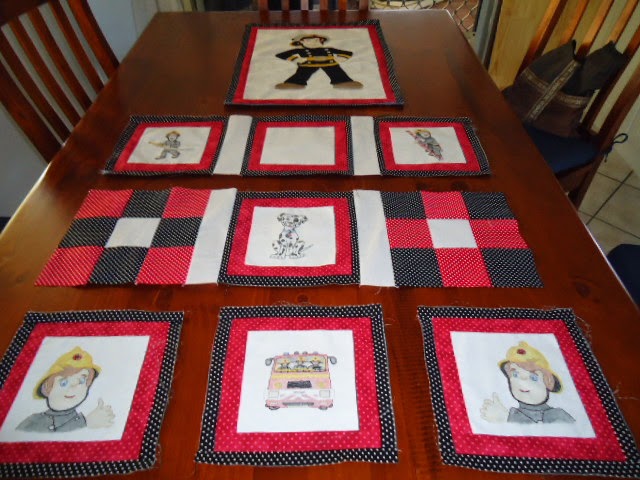
White boarders added to panels. The worst thing about making up the design as I go, is trying to work out the exact measurements. But I can say it was fun in the making, especially when the quilt started to come together.

 
Here I have added the white boarders and attached the strips together

 
This is where I got stuck and had to sit and just look and try and add the large panel, making it look like it belonged.

 
As you can see I managed to add the large fireman Sam to the quilt top, along with side panels. Getting it centred and the side panels to fit was a feat, it took me ages to work out the measurements. But overall I was quite pleased with the outcome.


The next step was to add the boarders of red dot and black dot. I really think the quilt top came up a treat, even if I do say so my self.
 
 
You can see a blank square block on the first row, this I embroidered Lennon's name and date of birth. Sorry I forgot to take a photo.

 
Next I have the quilt on my sewing machine where I sewed around each block and fireman Sam.


Here I'm just showing the backing material I used. I love the dots, plus I thought it was a good piece of material where any mistakes would not stand out. Especially when I did the free motion quilting.

 
I thought I would show you the extended table top my lovely husband David made me.

 
As you can see, the table top interlocks with the sewing machines table top. Giving me a larger area where the quilt lies flat and easier to mauver along table. He varnished the top so the quilt slides easily.


This is my long arm my lovely husband made me. I am so spoilt, David is always trying to help me with making items to make my sewing easier.
 
 
I quilted all the white area and boarders. This made the coloured panels stand out.


Here I hope you can see a full view of the long arm, it can take a 3metre quilt.


Well I'm very sorry but I forgot to take a photo of the finished quilt. I was in a hurry and had to get it posted off to the UK and didn't realise I'd missed taking the photo. I can tell you I was very pleased with the outcome and Lennon was a very happy little boy, he loved it.


It's been awhile but i'm back

It's been a while I know but I have been very busy trying to sort my life out. Being made redundant was not very nice and it has taken me a while to get myself back on track. I am now moving in the right direction, so hopefully I will be able to start adding new posts to my blog. Over the next couple of days I am hoping to bring my blog back up to date. I might have been absent from the blog, but I have been busy sewing. I am currently learning how to use my new lap top my husband kindly bought for me. I am hoping now that I have my own computer I should be able to go onto my blog more often, well here's hoping, has my closest friends will tell you, I'm not the best at doing things on the computer. I get too frustrated when the stupid thing won't do what I want (well  it's really me the operator who doesn't know how to do what I want on the stupid thing) but here's to learning. I have managed to down load some photo's from my camera onto the laptop so you never know I might be able to manage to up load some onto the blog later today, that's if I can remember how Jenny showed me, it's been a while since I last posted.

Like I said I might not have been blogging but I have been busy, I finished the fireman Sam quilt, I have made another quilt for my new granddaughter Zoey, made a small gift for my sewing buddies, birthday gifts, my lovely husband has made me some items for my sewing room. So I am looking forward to showing you once I have worked out how to post the pics, so hopefully you won't have to wait too long.

Michelle

Saturday, 19 April 2014

My sewing bag

I decided I needed a sewing bag for when I get together with the girls on our Monday sewing days. After looking through plenty of mag's & books I decided to do the one pictured below,"Sewing Notions Bag by Rhonda Thornley"  from Patchwork & Stitching magazine Vol 14 No 1. Well my version anyway. - This is a work in progress along with many other projects.


As you can see the pictures on the bag were created by an embroidering machine. I don't have one of those so I drew them free hand,


Once I had drawn them onto my material,(sorry no picture, I forgot to take one) I coloured then with Derwent pencils and sealed with Plaid textile medium


 These are now ready to be stitched.
I am going on holiday in the next couple of days for 4-5 weeks, so will have plenty of relax time to do stitching.(maybe)
 
 
I now have plenty of stitching to do, with these 3 pic's and 6 Fireman Sam pic's so I should keep out of mischief.  I will take lots of pictures of my adventures over the next 5 weeks & I will up date my blog as soon as I return home.
So Please keep looking in to see my progress on all my projects.
Happy stitching Ladies.

Quilt for my Sister's Grandchild - Lennon

This quilt is a work in progress. Lennon loves fireman Sam so I thought I would make him a quilt he would love.

I down loaded the free pictures from Fireman Sam Colouring pages from the internet website. Then enlarged them to fit my 6 1/2in blocks.

The 2 pictures below are the first I downloaded and resized.
They are on my light box my lovely husband made, ready for tracing.


I reversed this picture so I could have then facing inwards for when I assemble


Next was the fire truck


I then down loaded 3 more pictures.    Fireman Sam climbing a ladder


Fireman Sam holding the fire hose


Fireman Sam's Dog


All pictures traced and ready for colouring and stitching


These are the pencils I used to colour the drawings, this technique I learned doing one of Helen Stubbing's Colourque' projects (that's still a work in progress)


Once I coloured the drawings I sealed with 'Plaid textile medium'


I then added a red spot & black spot boarder, this was so I could hold them better in my hoop for embroidering


I then decided I needed a bigger picture for the quilt, so I enlarged the next picture 2 x A4 paper


This picture I decided to Applique.
He is now ready for stitching.


I am going away for 4-5 weeks on a biking / camping trip so will be taking these with me. Not sure how much I will get done, but at least I will have some stitching with me for when I am relaxing.

Thursday, 17 April 2014

Quilt for my Sister's grand Child Authur

I have 2 Sisters who live in the UK, I have only seen them twice in over 30 years. I have missed my Niece's & Nephew's growing up and now they are having children. Time just passing by so quickly.
 
My older sister Pamela now as 2 Grandchildren Lennon 3 years & Arthur 4 months. I have decided to make a quilt for the grand children something they can have as a keepsake & to remember they have family over here in Australia.
 
This is the quilt I have made for Arthur. I made the pattern up as I went along, I don't think it turned out too bad.
 
On the top row I did 2 patch blocks & in the centre I embroidered this Bear.
 
The next row I did one patch block with 2 embroidered ducks either side. The ducks I reversed to face inwards
 
 
Next row was two patch blocks with Arthurs name & date in the centre
 
 
The last row I did one patch block with 2 embroidered bears either side.
 
 
As you can see on the finished quilt, I quilted each block slightly different & finished the quilt with a blue & white boarder.


Tuesday, 15 April 2014

Making a Bag - Gift for a Dear Friend

So a pattern in a Country Threads magazine Vol 13 No.4 for a lovely patchwork bag designed by Leeanne Pitman.

I made 2 bags - one like this which I gave to my lovely daughter in-law for her birthday. I didn't take a photo of that but it did turn out lovely.


The second bag I made I changed slightly: I used a different panel front & inserted pockets on the inside.           
I used this favorite saying my friend loves as the front Panel


I inserted pockets on the back of the bag liner


The view from the back of the bag


The view from the front 

 
The finished project - well nearly finished I just have to hand stitch the binding .
I think the bag turned out very well - I'm sure my friend will like it.
 

Been Busy

Hi everyone,
 I know it's been a while but I promise I have been busy creating, I just need to get into the habit of posting my creations for you all to see.

Made a Dress. I just wanted a couple of simple dresses I could wear through summer & winter. I find it difficult when shopping for clothes to getting them to fit properly. I'm not large by any means but very different at the top of my body as to the bottom. This dress is a simple pattern from Kwik & Easy : K387. I have altered it slightly for my comfort. the pattern as a bit more flair & I prefer more fitted. I also added a belt to the back & lined the dress instead of interfacing

 
This is just waiting for me to hem the dress, like many projects of mine I can take a while to finish the last step.
 
 
The back of the dress, looks better once pressed, I still have too hem it and hand sew the arm hole edge. This is where I turned it right side out once attaching to the petticoat liner.
 
 
I made 3 of these, they are very comfortable in the heat and will be good with skivvy & leggings for winter.